There are many software are available to create a bootable USB flash drive or pendrive but if some don’t want to use the software. There are many tutorials out there which explains how to create bootable pendrive but most people are confused. They end up doing a wrong step leading to failure to create bootable pendrive.
We are there to help you create bootable USB flash drive very easily
without failure. We provided the step-by-step process with screenshots
to make it easier for you to understand. If you follow the exact process
then you can create a bootable pendrive without any issues.
You
can install all Windows versions like Windows 7, 8, 8.1 and 10 using
pendrive. Just download ISO of the Windows and follow the below steps.
Note: You need to have atleast 4GB pendrive and your Windows installation files or Windows DVD.
If you are not looking for software then this is the easiest way to make your pendrive bootable using Windows CMD.
Creating Bootable USB Drive Using DiskPart
- First, you need to plug in your USB flash drive or pendrive to your computer/laptop.Now run the command prompt as administrator by searching for cmd and right-click on it click “Open as administrator” or do a Shift+Enter.
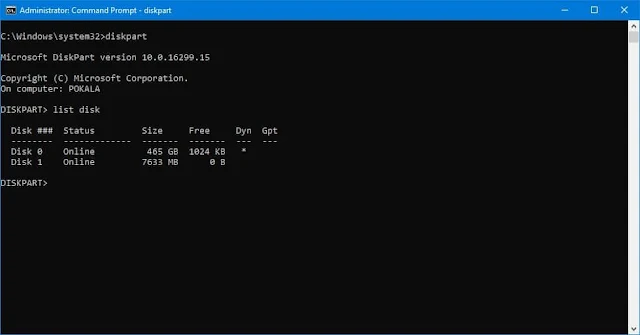
- Once you opened the command prompt. Just enter type diskpart command and hit Enter.
- Now, you will be in the diskpart. Type list disks and hit Enter. list disk is used to show all your external disks.

- You will now see two disks: Disk 0 and Disk 1. Disk 0 is the primary hard disk of your computer and Disk 1 is your USB flash drive (pendrive). You need to select Disk 1 which your pendrive. To select Disk 1, type select disk 1 and hit Enter. Once you have done that, you will see a message Disk 1 is now the selected disk.
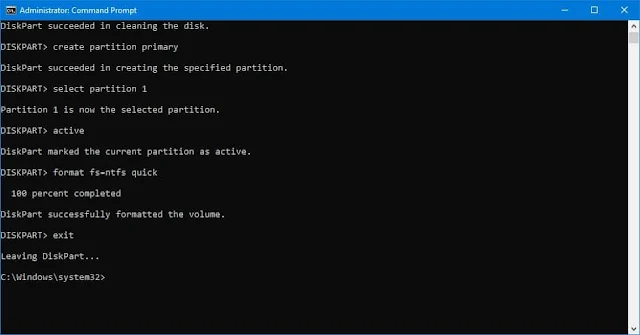
- Next, you need to format your selected USB flash drive. To do that, type clean and hit Enter. You will now see a message saying DiskPart succeeded in cleaning the disk.
- You need to create a partition on your USB drive. Type create primary partition and hit Enter.
- Now, you need to select partition using select partition 1 and hit Enter.
- You need to make partition 1 active by typing active and hit Enter.
- Finally, format the active partition by entering format fs=ntfs quick and hit Enter. Now, your USB flash drive partition is formatted. This will take some time.
- You have successfully created bootable pendrive. Sometimes, your pendrive will not be visible after above step. Just type assign drive=Z and hit Enter.
- Now, type exit to exit out of DISKPART.
- You can now copy your Windows installation files and boot from your USB Drive.
If you have the operating system in a DVD then follow the above process by skipping the 12th step.
Note: Only follow the below steps if you have a DVD installer or you need to copy files from DVD drive.
Creating Boot Sector
- Once you have done the above process. You need to enter to your DVD drive partition from current location i.e.., C:\Windows\system32. To do that, just type your DVD drive letter and colon(:). In my case, my DVD drive is F and I will type F: and hit enter.
- Now, type cd boot and hit Enter. You will be now in F:boot>.
- To make USB drive bootable, type ‘bootsect /nt60 d:‘ and hit Enter. Please note that d: is the drive letter for my flash drive.
- Now, you have successfully created a bootable drive which can be used as a bootable media.
Copy Windows files from DVD installer to USB FlashDrive
You
need to copy all your Windows installation files on DVD installer to
USB flash drive to install windows from USB flash drive. Just type xcopy f: \ *. * Z: \ / E / H / F. Here F: is the DVD drive letter and it may different for you. Z: is the USB flash drive or pendrive letter.
This
copy process will take upto 10 minutes. Once this completed, you can
install Windows using your bootable pendrive or USB flash drive.
If you are facing any issues the feel free to comment down below. I will try to help you to fix the issues.
Advertisement

![Create Bootable USB Drive Without Any Software [Win 7, 8, 8.1, and 10] Create Bootable USB Drive Without Any Software [Win 7, 8, 8.1, and 10]](https://blogger.googleusercontent.com/img/b/R29vZ2xl/AVvXsEgtBcwENfTbyeOjYPVfs9OI9YJCJKZ3VwSKr2FQoqpdrP_RIyWeYwochKAe4m1eMMzhppsWVjiksOfQglYWaARBzxBkZUfasX5JZb4P3iZO8PpdkFIHoxI8nVR1eGmVOn4kEvvsThkLgOIN/s640-rw/create-bootable-usb-drive.jpg)


This post have 0 Comments
EmoticonEmoticon